The Custom Tabs feature is a powerful tool that allows you to create fully customized tabs tailored to your agency’s unique offerings and client needs. This feature opens up a world of possibilities for enhancing your client’s dashboard experience.
Creating Custom Tabs
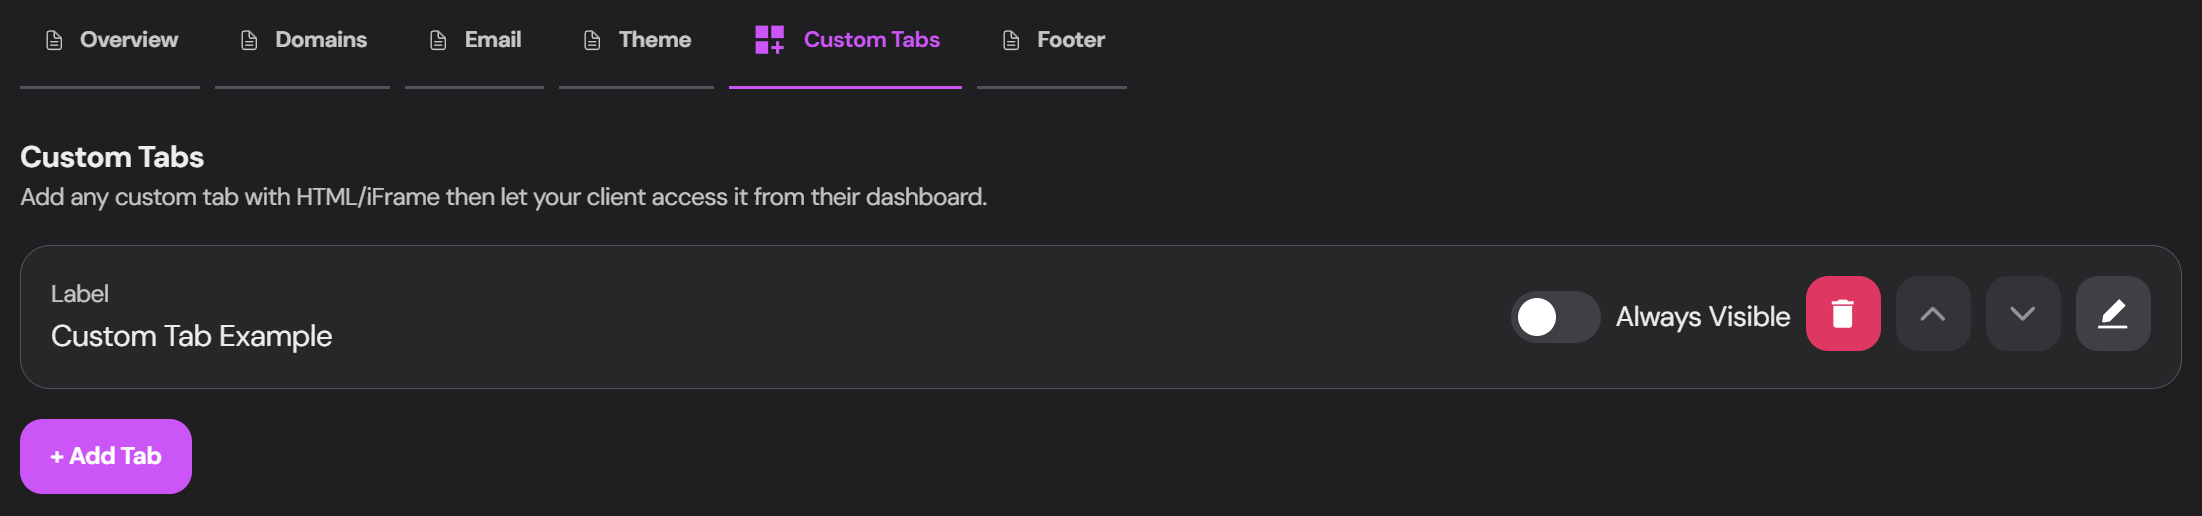
Access Custom Tabs
Navigate to the Custom Tabs section in your agency settings.
Add New Tab
Click the + Add Tab button to create a new custom tab.
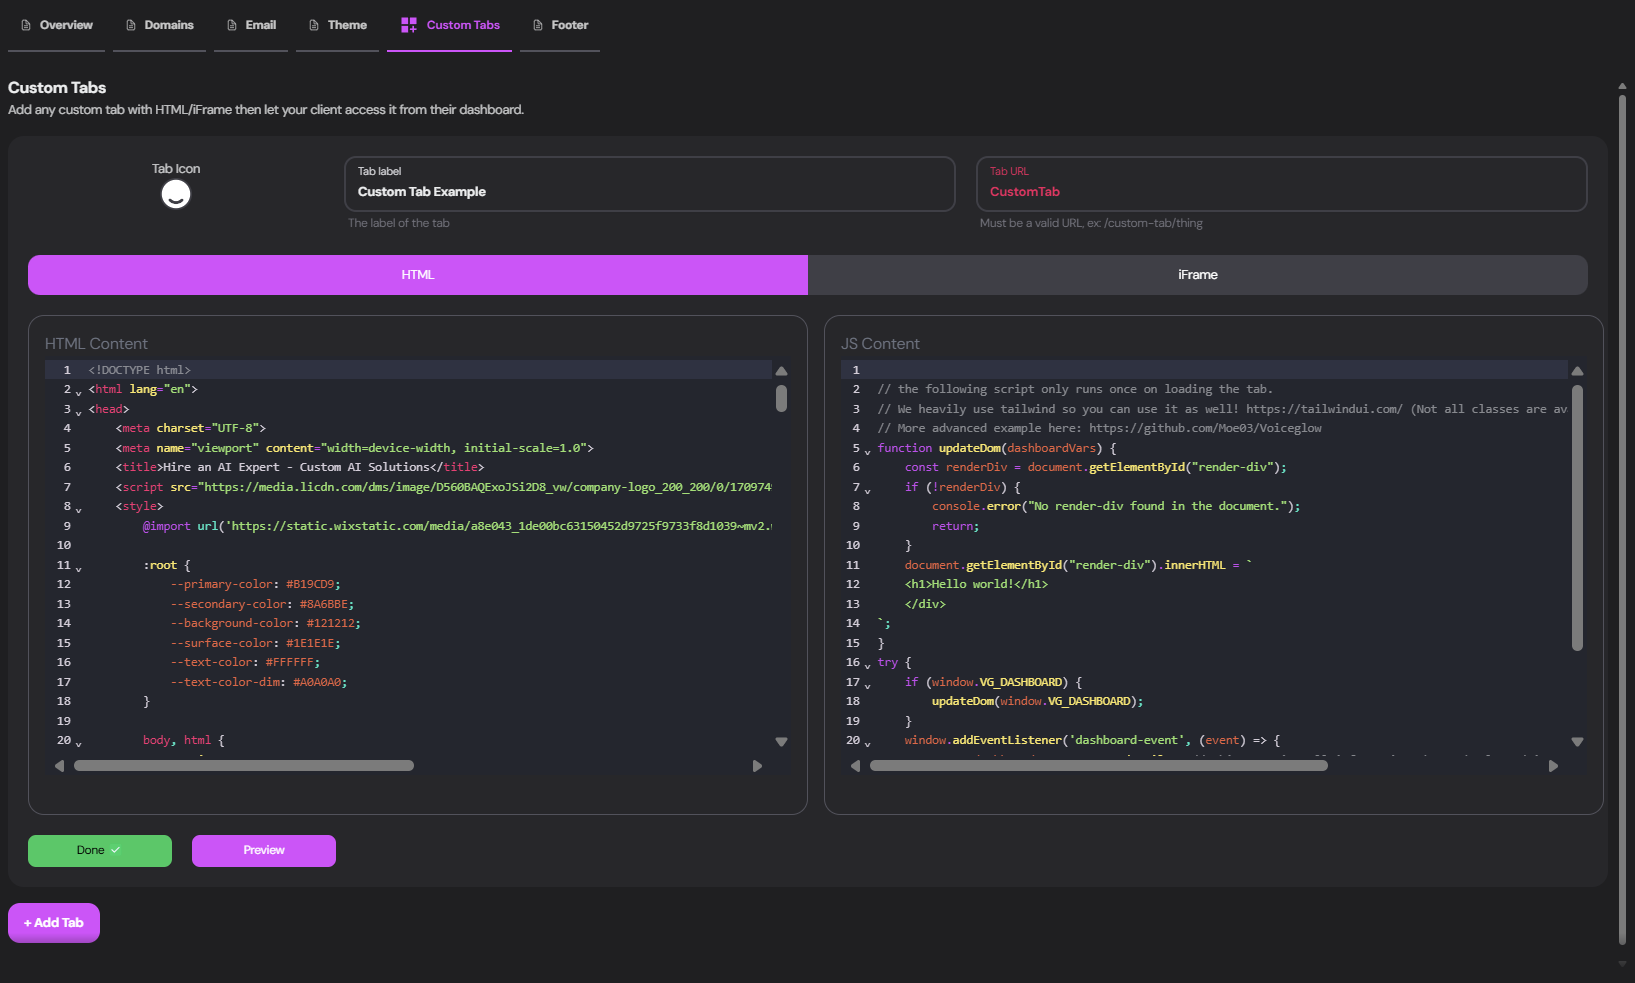
Configure Tab Settings
For each tab, set the following:
Choose an icon to represent the tab. This helps users quickly identify the tab’s purpose in the dashboard.
Enter a name for the tab. This label will be displayed in the client’s dashboard navigation, so make it clear and concise.
Set a unique identifier for enabling client access. This URL will be used internally to reference the tab and can be used when setting up permissions for different users access to the tab. Tabs make for extremely good opportunities for Up-selling to your clients. Everything from new services, extra agents to feedback loops. Be creative .
Choose Content Type
Select between HTML (with JavaScript) or iFrame : <!-- Your custom HTML here --> < div id = "render-div" ></ div > < script > // Your custom JavaScript here document . getElementById ( "render-div" ). innerHTML = "<h1>Hello World!</h1>" ; </ script >
Preview and Save
Use the Preview button to check your tab’s appearance, then click Done to save.
Managing Custom Tabs
Visibility Toggle Use the Always Visible switch to control tab visibility for all clients.
Reordering Click the arrow buttons to change the tab’s position in the list.
Editing Click the edit icon to modify an existing tab’s content or settings.
Deleting Remove unwanted tabs using the delete button.
Use Cases and Ideas Here are some advanced, colorful, and feature-rich examples you can copy and paste into your custom tabs to see the possibilities:
Interactive AI Art Generator
<! DOCTYPE html > < html lang = "en" > < head > < meta charset = "UTF-8" > < meta name = "viewport" content = "width=device-width, initial-scale=1.0" > < title > AI Art Generator </ title > < style > body { font-family : 'Arial' , sans-serif ; background : linear-gradient ( 45 deg , #ff6b6b , #4ecdc4 ); color : white ; display : flex ; justify-content : center ; align-items : center ; height : 100 vh ; margin : 0 ; } .container { background : rgba ( 255 , 255 , 255 , 0.1 ); border-radius : 20 px ; padding : 40 px ; box-shadow : 0 8 px 32 px 0 rgba ( 31 , 38 , 135 , 0.37 ); backdrop-filter : blur ( 4 px ); border : 1 px solid rgba ( 255 , 255 , 255 , 0.18 ); } h1 { text-align : center ; color : #fff ; text-shadow : 2 px 2 px 4 px rgba ( 0 , 0 , 0 , 0.5 ); } input , button { width : 100 % ; padding : 10 px ; margin : 10 px 0 ; border-radius : 5 px ; border : none ; } button { background-color : #6c5ce7 ; color : white ; cursor : pointer ; transition : background-color 0.3 s ease ; } button :hover { background-color : #5641e5 ; } #result { margin-top : 20 px ; text-align : center ; } #generatedImage { max-width : 100 % ; border-radius : 10 px ; box-shadow : 0 4 px 15 px rgba ( 0 , 0 , 0 , 0.2 ); } </ style > </ head > < body > < div class = "container" > < h1 > 🎨 AI Art Generator </ h1 > < input type = "text" id = "prompt" placeholder = "Enter your art prompt" > < button onclick = " generateArt ()" > Generate Art </ button > < div id = "result" ></ div > </ div > < script > function generateArt () { const prompt = document . getElementById ( 'prompt' ). value ; const result = document . getElementById ( 'result' ); result . innerHTML = 'Generating your masterpiece...' ; // Simulating API call to an AI art generation service setTimeout (() => { const imageUrl = `https://picsum.photos/800/600?random= ${ Math . random () } ` ; result . innerHTML = ` <h3>Your AI-generated art:</h3> <img id="generatedImage" src=" ${ imageUrl } " alt="AI-generated art"> ` ; }, 2000 ); } </ script > </ body > </ html >
Dynamic Dashboard Analytics
<! DOCTYPE html > < html lang = "en" > < head > < meta charset = "UTF-8" > < meta name = "viewport" content = "width=device-width, initial-scale=1.0" > < title > Dynamic Dashboard Analytics </ title > < script src = "https://cdn.jsdelivr.net/npm/chart.js" ></ script > < style > body { font-family : 'Roboto' , sans-serif ; background : linear-gradient ( 120 deg , #84fab0 0 % , #8fd3f4 100 % ); margin : 0 ; padding : 20 px ; box-sizing : border-box ; min-height : 100 vh ; } .dashboard { display : grid ; grid-template-columns : repeat ( auto-fit , minmax ( 300 px , 1 fr )); gap : 20 px ; } .card { background : rgba ( 255 , 255 , 255 , 0.9 ); border-radius : 15 px ; padding : 20 px ; box-shadow : 0 8 px 32 px rgba ( 31 , 38 , 135 , 0.15 ); } h2 { color : #333 ; margin-top : 0 ; } .metric { font-size : 2 em ; font-weight : bold ; color : #4a4a4a ; } canvas { max-width : 100 % ; } </ style > </ head > < body > < div class = "dashboard" > < div class = "card" > < h2 > Total Users </ h2 > < div class = "metric" id = "totalUsers" > Loading... </ div > </ div > < div class = "card" > < h2 > Revenue </ h2 > < div class = "metric" id = "revenue" > Loading... </ div > </ div > < div class = "card" > < h2 > User Growth </ h2 > < canvas id = "userGrowthChart" ></ canvas > </ div > < div class = "card" > < h2 > Platform Usage </ h2 > < canvas id = "platformUsageChart" ></ canvas > </ div > </ div > < script > // Simulated data fetching and chart rendering setTimeout (() => { document . getElementById ( 'totalUsers' ). textContent = '1,234,567' ; document . getElementById ( 'revenue' ). textContent = '$9,876,543' ; new Chart ( document . getElementById ( 'userGrowthChart' ), { type: 'line' , data: { labels: [ 'Jan' , 'Feb' , 'Mar' , 'Apr' , 'May' , 'Jun' ], datasets: [{ label: 'User Growth' , data: [ 1000 , 1500 , 2000 , 3000 , 4000 , 5000 ], borderColor: 'rgb(75, 192, 192)' , tension: 0.1 }] } }); new Chart ( document . getElementById ( 'platformUsageChart' ), { type: 'doughnut' , data: { labels: [ 'Web' , 'Mobile' , 'Tablet' ], datasets: [{ data: [ 300 , 50 , 100 ], backgroundColor: [ '#FF6384' , '#36A2EB' , '#FFCE56' ] }] } }); }, 1000 ); </ script > </ body > </ html >
AI-Powered Customer Feedback Analyzer
<! DOCTYPE html > < html lang = "en" > < head > < meta charset = "UTF-8" > < meta name = "viewport" content = "width=device-width, initial-scale=1.0" > < title > AI Feedback Analyzer </ title > < style > body { font-family : 'Segoe UI' , Tahoma , Geneva, Verdana , sans-serif ; background : linear-gradient ( 135 deg , #667eea 0 % , #764ba2 100 % ); color : #ffffff ; display : flex ; justify-content : center ; align-items : center ; height : 100 vh ; margin : 0 ; padding : 20 px ; box-sizing : border-box ; } .container { background : rgba ( 255 , 255 , 255 , 0.1 ); border-radius : 20 px ; padding : 40 px ; width : 80 % ; max-width : 800 px ; box-shadow : 0 8 px 32 px 0 rgba ( 31 , 38 , 135 , 0.37 ); backdrop-filter : blur ( 4 px ); border : 1 px solid rgba ( 255 , 255 , 255 , 0.18 ); } h1 { text-align : center ; color : #fff ; margin-bottom : 30 px ; } textarea { width : 100 % ; height : 150 px ; padding : 15 px ; border-radius : 10 px ; border : none ; margin-bottom : 20 px ; font-size : 16 px ; } button { width : 100 % ; padding : 15 px ; background-color : #4CAF50 ; color : white ; border : none ; border-radius : 10 px ; cursor : pointer ; font-size : 18 px ; transition : background-color 0.3 s ease ; } button :hover { background-color : #45a049 ; } #result { margin-top : 30 px ; background : rgba ( 255 , 255 , 255 , 0.2 ); padding : 20 px ; border-radius : 10 px ; } .sentiment { font-size : 24 px ; font-weight : bold ; text-align : center ; margin-bottom : 20 px ; } .keywords { display : flex ; flex-wrap : wrap ; justify-content : center ; gap : 10 px ; } .keyword { background : rgba ( 255 , 255 , 255 , 0.3 ); padding : 5 px 10 px ; border-radius : 20 px ; font-size : 14 px ; } </ style > </ head > < body > < div class = "container" > < h1 > 🤖 AI Feedback Analyzer </ h1 > < textarea id = "feedbackInput" placeholder = "Paste customer feedback here..." ></ textarea > < button onclick = " analyzeFeedback ()" > Analyze Feedback </ button > < div id = "result" ></ div > </ div > < script > function analyzeFeedback () { const feedback = document . getElementById ( 'feedbackInput' ). value ; const result = document . getElementById ( 'result' ); result . innerHTML = '<p>Analyzing feedback...</p>' ; // Simulating AI analysis setTimeout (() => { const sentiments = [ '😃 Positive' , '😐 Neutral' , '😞 Negative' ]; const sentiment = sentiments [ Math . floor ( Math . random () * sentiments . length )]; const keywords = [ 'Product' , 'Service' , 'Quality' , 'Price' , 'Support' , 'User Experience' ] . sort (() => 0.5 - Math . random ()) . slice ( 0 , 4 ); result . innerHTML = ` <div class="sentiment"> ${ sentiment } </div> <h3>Key Insights:</h3> <div class="keywords"> ${ keywords . map ( keyword => `<span class="keyword"> ${ keyword } </span>` ). join ( '' ) } </div> <p>The feedback primarily focuses on ${ keywords . join ( ', ' ) } . Overall sentiment appears to be ${ sentiment . toLowerCase () } . Consider addressing these key areas to improve customer satisfaction.</p> ` ; }, 2000 ); } </ script > </ body > </ html > Remember to adapt these examples to fit your specific use case and branding. They serve as a starting point to inspire your own creative and functional custom tabs.