Introduction
Our Google Sheets integration allows your AI agent to write to Google Sheets. This powerful feature enables you to manage lead lists, log conversation data, and interact with your existing workflows directly from your agent. This guide will walk you through connecting your Google account, setting up the Google Sheets tool in your agent, and configuring it for use.1. Connecting Your Google Account
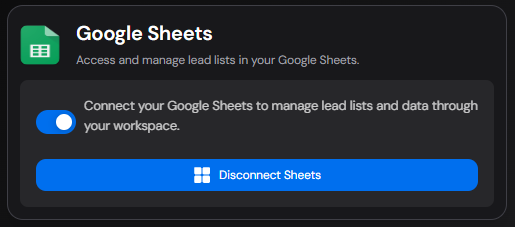
Before you can use the Google Sheets tool, you need to connect your Google account to your workspace.- Navigate to the Integrations tab from the main menu.
- Find Google Sheets in the list of available integrations.
- Click the Connect button.
- You will be redirected to a Google authentication screen. Log in to the Google account that has access to the sheets you want to use.
- Grant the necessary permissions to allow Tixae to access your Google Sheets.
2. Setting Up the Google Sheets Tool
Now that your account is connected, you can add the Google Sheets tool to any of your agents.- Go to the Agents tab and select the agent you want to edit.
- Navigate to the Canvas for that agent.
- Select an existing node or create a new one where you want to use the Google Sheets functionality.
- In the node configuration panel, click on Add Tool.
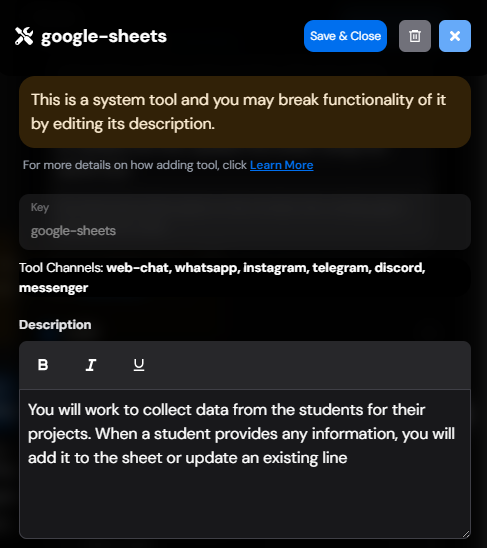
- From the list of default tools, select Google Sheets.
- Provide a descriptive description for the tool. This helps the AI understand when and how to use this tool. For example, a good description would be “Use this tool to save the user’s name and email to our lead list spreadsheet.”
3. Configuring the Sheet and Headers
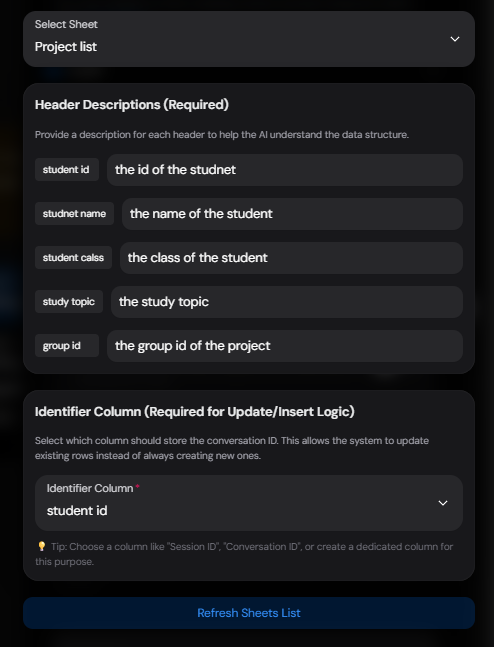
After adding the tool, you need to configure which sheet to use and how the data should be structured.- Select a Sheet: From the dropdown menu, a list of your available Google Sheets will appear. Select the sheet you want the agent to interact with.
- Header Descriptions: Once you select a sheet, the tool will fetch all the column headers from the first row of that sheet. You must provide a clear and concise description for each header. This is a critical step, as the AI uses these descriptions to understand what each column represents and how to correctly map data to each column. For example, for a header named
email_address, a good description would be “The user’s primary email address”. - Select Identifier Column: Choose a column that will serve as a unique identifier for each row. A common choice is a column for
conversation_idorsession_id. When an identifier column is set, the system will first try to find an existing row with the same ID and update it. If no existing row is found, it will create a new one. This is useful for updating information for the same user across multiple interactions.
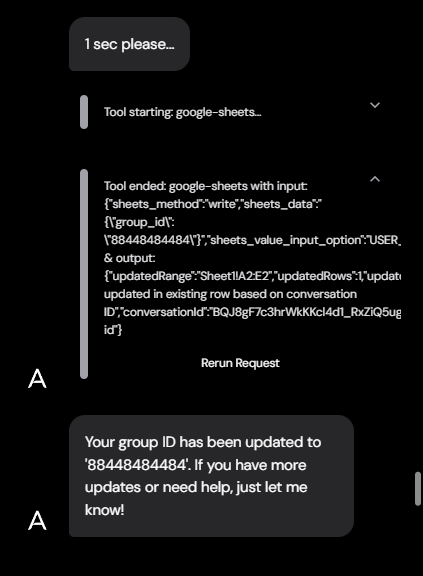
4. Usage and Debugging
Your Google Sheets tool is now ready to be used! The agent’s AI will decide when to call this tool based on its description and the context of the conversation. You can monitor the tool’s usage and see detailed information in the Debugger. When the tool is activated, you will see a tool call event with the data that was sent to Google Sheets and the response received. This is very useful for troubleshooting and ensuring the integration is working as expected.